
Every paint job needs adequate preparation, which is key to a durable and long-lasting paint finish. Proper preparation before painting the exterior of a house is crucial for achieving a durable and aesthetically pleasing finish. This preparation process, which includes cleaning, repairing, and priming the surface, ensures that the paint adheres properly, reducing the risk of peeling, cracking, and fading over time.
For homeowners, take your time to prepare the surface thoroughly to significantly extend the life of your paint job, maintain the beauty of your home’s exterior, and protect it from the elements.
Inspecting the exterior
Guide to inspecting the exterior before painting
Before painting the exterior of your home, it’s crucial to conduct a thorough inspection to ensure a smooth and long-lasting finish. Here’s a guide to help you identify and address potential issues:
1. Walk around the entire house: Start by walking around the entire exterior, noting any problems. This initial walk-through will help you identify areas that need closer examination.
2. Check for cracks and gaps:
- Inspect walls, especially around windows, doors, and corners, for cracks or gaps in the siding or trim.
- You can fill small cracks with caulk, but larger cracks may require more extensive repairs.
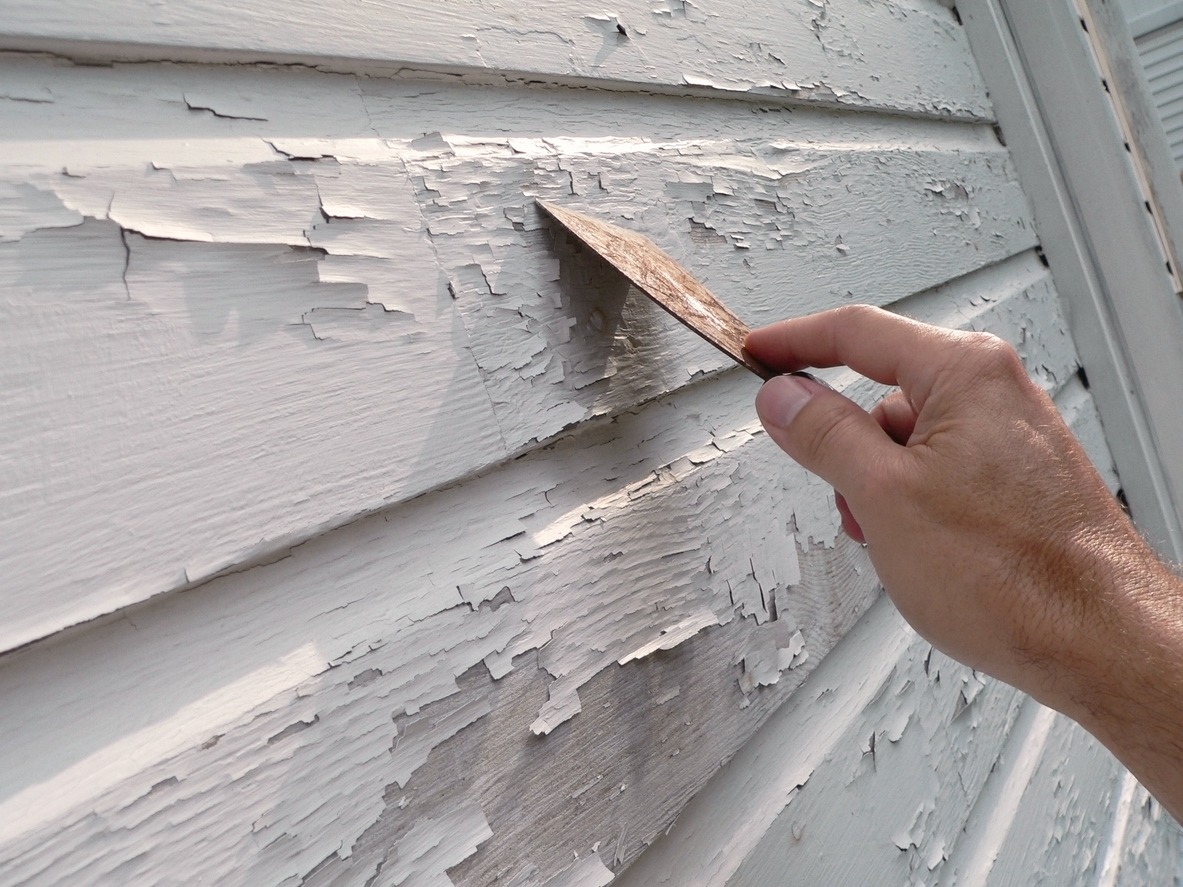
3. Look for peeling or flaking paint:
- Pay attention to areas where paint is peeling or flaking.
- Scrape these areas and sand them down to create a smooth surface before applying new paint.
4. Inspect for mold and mildew:
- Check for dark, discolored patches that may indicate mold or mildew, particularly in shaded or damp areas.
- Remove mold and mildew with a bleach-and-water solution to prevent it from resurfacing through the new paint.
5. Examine the condition of wood and other materials:
- Inspect wood surfaces for signs of rot, such as soft spots or discoloration.
- Check other materials like stucco or brick for damage or wear. Repair any compromised areas before painting.
6. Evaluate caulking and seals:
- Check the caulking around windows, doors, and other joints. If the caulking is cracked or missing, it should be replaced to prevent moisture infiltration.
7. Assess gutters and downspouts:
- Ensure that gutters and downspouts are in good condition and securely attached. Poor drainage can cause water damage to the surfaces you plan to paint.
Conduct a thorough inspection and address these issues to ensure the surface is correctly prepared for painting, leading to a more durable and attractive finish.
Cleaning the surface
Properly cleaning the exterior surface ensures a durable and professional-looking paint job. Here’s how to do it:
Steps to properly clean exterior surfaces
1. Power washing:
- Preparation: Before power washing, cover plants, outdoor furniture, and other items with plastic sheets to protect them from water and debris.
- Washing: Use a power washer to remove dirt, grime, mold, and mildew from the surface. Start at the house’s top and work your way down to prevent streaks. Keep a consistent distance from the surface to avoid damage.
- Pressure settings: Adjust the pressure based on the material of the surface. Use lower pressure for wood siding and higher pressure for concrete or brick.
- Drying: Allow the surface to dry completely, which may take 24-48 hours, depending on the weather.
2. Scraping and sanding:
- Old paint removal: After power washing, scrape off any loose or peeling paint using a paint scraper. Pay special attention to areas where the paint is blistering or chipping.
- Sanding: Sand the scraped areas to smooth out rough spots and create a uniform surface for the new paint to adhere to. Use medium-grit sandpaper for large areas and fine-grit for detail work.
3. Cleaning with mildew remover:
- Mildew treatment: If mildew or mold is present, use a mildew remover or a mixture of water and bleach (3:1 ratio) to treat affected areas. Scrub the area with a brush, then rinse thoroughly with water.
4. Final rinse:
- After scraping, sanding, and treating for mildew, give the entire surface a final rinse with a garden hose to remove any remaining debris.
Importance of removing dirt, grime, and old paint residues
- Better adhesion: Clean surfaces allow the paint to adhere more effectively, leading to a smoother and more durable finish.
- Preventing peeling: Dirt, grime, and loose paint can cause new paint to peel and flake prematurely.
- Enhancing appearance: A clean surface ensures the new paint will look vibrant and even, without blemishes caused by underlying dirt or old paint.
- Longevity of the paint job: Properly cleaned and prepped surfaces contribute to the longevity of the paint job, reducing the need for frequent repainting.
Making necessary repairs
Before painting exterior surfaces, it’s crucial to make necessary repairs to ensure a smooth and durable finish. Here are some tips and essential information on the process:
1. Repairing cracks, holes, and other damages
- Cracks: Clean out the crack with a wire brush or scraper to remove loose debris. Fill the crack with an exterior-grade caulk or sealant. For larger cracks, use a concrete patch or filler. Smooth the surface with a putty knife and let it dry completely before sanding.
- Holes: For small holes, use an exterior spackling compound. Apply the compound with a putty knife, filling the hole. For larger holes, consider using an exterior-grade filler or patch kit. After filling, sand the surface smooth once it’s dry.
- Peeling paint: Scrape off any loose or peeling paint with a paint scraper. Sand the edges of the remaining paint to blend it with the surrounding area. Prime the exposed surface before painting.
2. Materials and tools needed for common exterior repairs
Materials:
- Exterior-grade caulk or sealant
- Spackling compound
- Concrete patch or filler
- Exterior wood filler
- Primer suitable for exterior surfaces
-
Tools:
- Wire brush
- Paint scraper
- Putty knife
- Sandpaper (various grits)
- Caulking gun
- Paintbrush or roller for applying primer
3. Additional tips
- Ensure all surfaces are clean and dry before beginning any repair work.
- For wood surfaces, check for rot and replace any damaged wood before filling holes or cracks.
- Use a high-quality primer to seal repairs, especially on porous surfaces like wood or stucco.
- Always follow the manufacturer’s instructions for drying times and application techniques.
Properly repairing exterior surfaces before painting enhances the appearance and increases the paint job’s longevity, protecting your home from the elements.
Sanding and scraping
Instructions on sanding rough spots and scraping loose paint
1. Sanding rough spots:
- Tools needed: Use medium-grit sandpaper (80-120 grit) or a power sander for larger areas.
- Procedure: Sand the rough or uneven surface areas to create a smooth base for painting. Focus on spots where old paint has peeled or bubbled. Sand until the surface feels smooth to the touch and is free of loose debris.
2. Scraping loose paint:
- Tools needed: Use a paint scraper, putty knife, or a wire brush.
- Procedure: Scrape off any loose, peeling, or flaking paint. Apply steady pressure to remove the old paint without damaging the underlying surface. If the paint doesn’t come off easily, use a softer approach to avoid gouging the surface.
Safety tips for sanding and dealing with lead paint
1. General sanding safety:
- Protective gear: Wear safety goggles and a dust mask or respirator to prevent inhaling dust and particles.
- Ventilation: Ensure proper ventilation by working outdoors or in well-ventilated areas.
2. Dealing with lead paint:
- Lead paint precautions: Homes built before 1978 may have lead-based paint. If you suspect lead paint, test it using a lead test kit before sanding or scraping.
- Safety measures:
-
- Protective gear: Wear a NIOSH-certified respirator, gloves, and protective clothing.
- Containment: Use plastic sheeting to cover the ground and catch any debris.
- Wet sanding: If lead paint is present, consider wet sanding or using a HEPA vacuum attachment to minimize dust.
- Disposal: Properly dispose of lead-contaminated waste following local regulations.
Priming the surface
Importance of priming before painting:
Priming exterior surfaces before painting is crucial for several reasons:
- Adhesion: Primer creates a strong bond between the surface and the paint, ensuring that the paint adheres properly and lasts longer.
- Surface protection: It seals the surface, protecting it from moisture and reducing the risk of peeling, blistering, and mildew growth.
- Uniform coverage: Primer helps achieve a uniform paint finish by covering imperfections and providing a consistent base, which is especially important when transitioning from dark to light colors or painting over bare wood, metal, or masonry.
- Enhanced durability: It improves the durability of the paint job, helping it withstand harsh weather conditions and extending the life of the paint.
Guide on selecting the correct primer and applying it correctly
1. Selecting the correct primer:
- Surface-specific primers: Choose a primer designed for the material you are painting (e.g., wood, metal, brick, or stucco). For example, a wood primer is essential for bare wood surfaces, while a masonry primer is suited for brick or concrete.
- Type of paint: Match the primer type with the paint type (oil-based or latex). Oil-based primers are great for blocking stains and are compatible with oil and latex paints, while latex primers are easier to work with and clean up.
- Special needs: If the surface has stains or mildew or is prone to rust, choose a primer with stain-blocking, mildew-resistant, or rust-inhibiting properties.
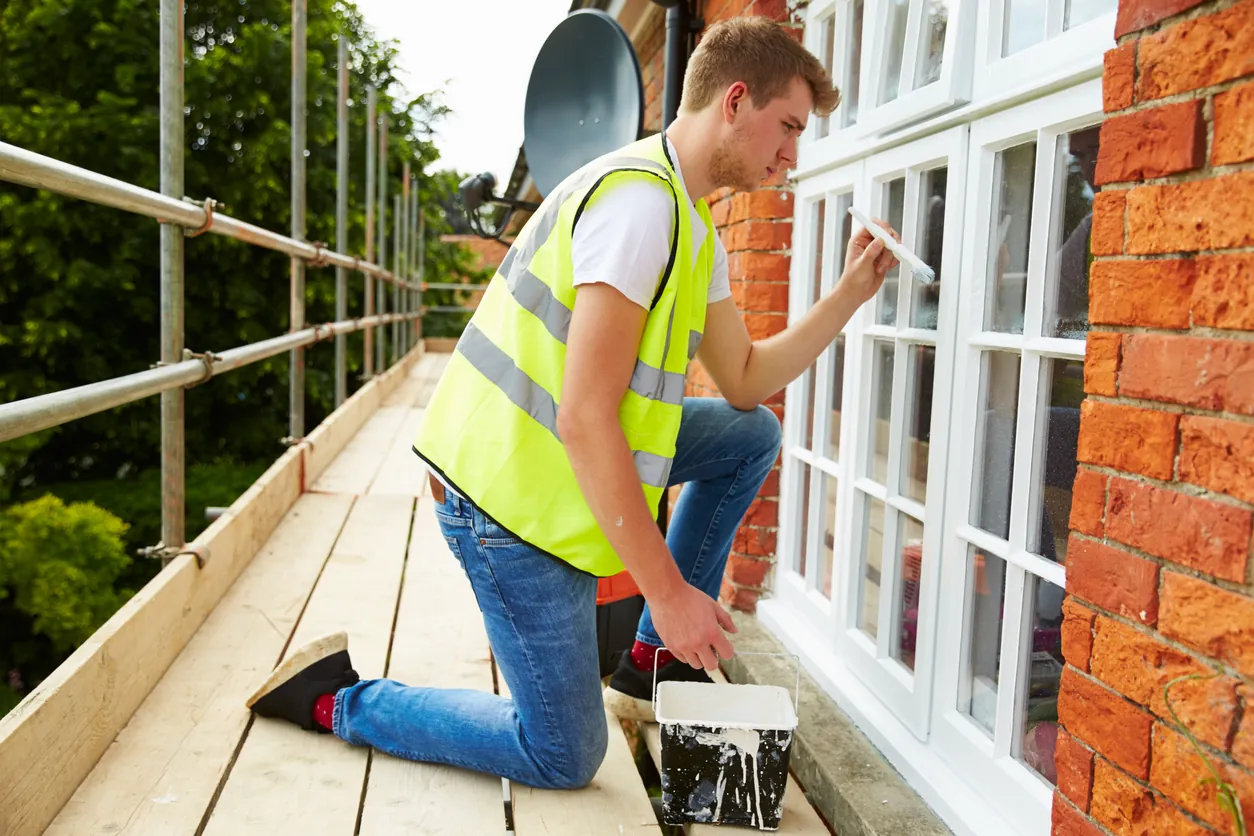
2. Applying the primer:
- Preparation: Ensure the surface is clean, dry, and free of loose paint, dust, and mildew. Sand any rough areas and repair any cracks or holes.
- Application: Apply the primer using a brush, roller, or sprayer, depending on the surface and your comfort level. Ensure an even coat without drips or thick spots.
- Drying time: Allow the primer to dry completely, following the manufacturer’s instructions before applying the paint. It ensures optimal adhesion and finish quality.
Priming is an essential step you should not skip, as it directly impacts the longevity and appearance of the exterior paint job.
Conclusion
Inspecting the exterior surface for damage and cleaning, repairing, sanding, scraping, and priming it are essential steps to achieving a durable and long-lasting paint finish.
Take time to prepare for a successful paint job, as thorough preparation is key to achieving the best results. When you’re ready to transform your space, don’t hesitate to call Custom Painting, Inc. at 925-294-8062 or message us on our contact page for expert assistance.