At first glance, a newly plastered wall can seem like the ideal canvas for your new paint. But painting over a newly plastered wall in interior painting in San Ramon isn’t as simple as it seems.
You can definitely paint over a newly plastered wall, but there are some factors you have to consider before doing so. Painting over newly plastered walls is a crucial step in the process of finishing interior surfaces. Plastering involves applying a smooth layer of plaster compound over walls or ceilings to create a uniform surface. Once the plaster has dried and cured, paint helps protect the plaster, enhances its appearance, and contributes to the overall aesthetics of the space. However, proper preparation and selection of suitable paint are essential to ensure adhesion, durability, and a high-quality finish.
Painting over plaster is a crucial step in finishing the walls of a building, whether it’s a new construction or a renovation project. The timing and techniques used in this process are essential to achieving a high-quality finish that is both durable and aesthetically pleasing. Understanding the proper timing and techniques for painting over plaster is important for the following reasons:
- Proper adhesion
- Surface preparation
- Low moisture content
- Priming
- Choosing the right paint
- Application techniques
Understanding plaster walls
Plaster is a material used to protect or decorate walls and ceilings and for molding and casting decorative elements. It’s made by heating gypsum, limestone, or other minerals to remove water, creating a powder that, when mixed with water, rehydrates and can be molded and shaped. Upon drying, it forms a solid, durable surface.
There are several common types of plaster used in walls, each with specific properties and applications:
- Gypsum plaster – Made primarily from gypsum, it’s the most widely used plaster for interior walls and ceilings. It offers a smooth finish and does not require the application of lime. Gypsum plaster sets quickly and has fire-resistant properties, making it a popular choice for modern construction.
- Lime plaster – Made from lime mixed with water and sand, lime plaster is one of the oldest types of plaster. It’s flexible, breathable, and offers natural antiseptic properties, making it ideal for historic restorations and sustainable construction projects. Lime plaster needs a longer time to set compared to gypsum plaster.
- Cement plaster – A mixture of Portland cement, sand, and water, cement plaster is used for exterior walls and wet areas like bathrooms and kitchens due to its resistance to moisture and durable nature. It’s also used for its strong structural capabilities and can be applied over brick, stone, or concrete surfaces.
- Venetian plaster – An aesthetic finishing plaster that imitates marble or stone, Venetian plaster is made from lime and mixed with marble dust. It’s applied in thin, multiple layers, which are then polished to a high shine. This type of plaster is used for decorative finishes on walls and ceilings, providing a depth of color and texture that’s unique to each application.
- Clay plaster – Composed of clay, sand, and straw or other fibers, clay plaster is environmentally friendly and offers excellent moisture regulation, making it suitable for natural buildings. It’s known for its ability to “breathe,” which helps in maintaining indoor air quality.
The drying and curing process of new plaster is crucial for achieving a strong, durable finish suitable for painting or wallpapering. This process involves both the physical evaporation of water from the plaster and chemical reactions that cause the plaster to harden. Here’s a detailed overview:
1. Drying phase
- Initial setting – After plaster is applied to walls or ceilings, it begins to set. This is when the plaster starts to harden but is still quite wet. The time it takes for plaster to set can vary depending on the type of plaster used, the thickness of the application, and environmental conditions.
- Evaporation – The water in the plaster mixture starts to evaporate, leaving behind the solid materials. Adequate ventilation is crucial during this phase to allow moisture to escape, speeding up the drying process. However, too much airflow can cause the plaster to dry too quickly, leading to cracks.
- Environmental factors – Temperature and humidity play significant roles in the drying time. Plaster dries best in warm, moderately humid conditions. Cold or overly humid environments slow down the drying process, while hot, dry conditions can cause the plaster to dry too quickly and crack.
2. Curing phase
- Chemical Reaction –Curing is the chemical process that continues after the initial drying. During curing, the plaster undergoes a chemical reaction (hydration) that strengthens the bond between the plaster particles, making the surface hard and durable.
- Timeframe – The curing process can take much longer than the initial drying. While plaster may feel dry to the touch in a few days, the curing process can take several weeks to complete. The exact time depends on the type of plaster and environmental conditions.
- Importance of Curing – Proper curing is essential for the plaster to achieve its full strength and durability. Premature painting or applying wallpaper can trap moisture, leading to problems like mold growth, peeling, or bubbling.
Environmental factors such as humidity and temperature significantly affect the drying times of plaster. Here’s a general overview of how these factors play a role:
- Humidity – High humidity levels in the air slow down the drying process of plaster because the moist air takes longer to absorb water from the plaster. When the air is saturated with moisture, the water in the plaster does not evaporate as quickly, leading to longer drying times. Conversely, in low humidity conditions, the air can absorb moisture more readily, resulting in faster drying of the plaster.
- Temperature – The temperature also plays a critical role in the drying time of plaster. Warmer temperatures may speed up the drying process as heat energy increases the rate of evaporation of water from the plaster. Warm air can hold more moisture than cold air, facilitating faster drying under warm conditions. On the other hand, cold temperatures slow down the evaporation process, extending the drying time of plaster. Extremely hot conditions, however, can cause plaster to dry too quickly, potentially leading to cracking and reduced strength.
The risks of painting too soon
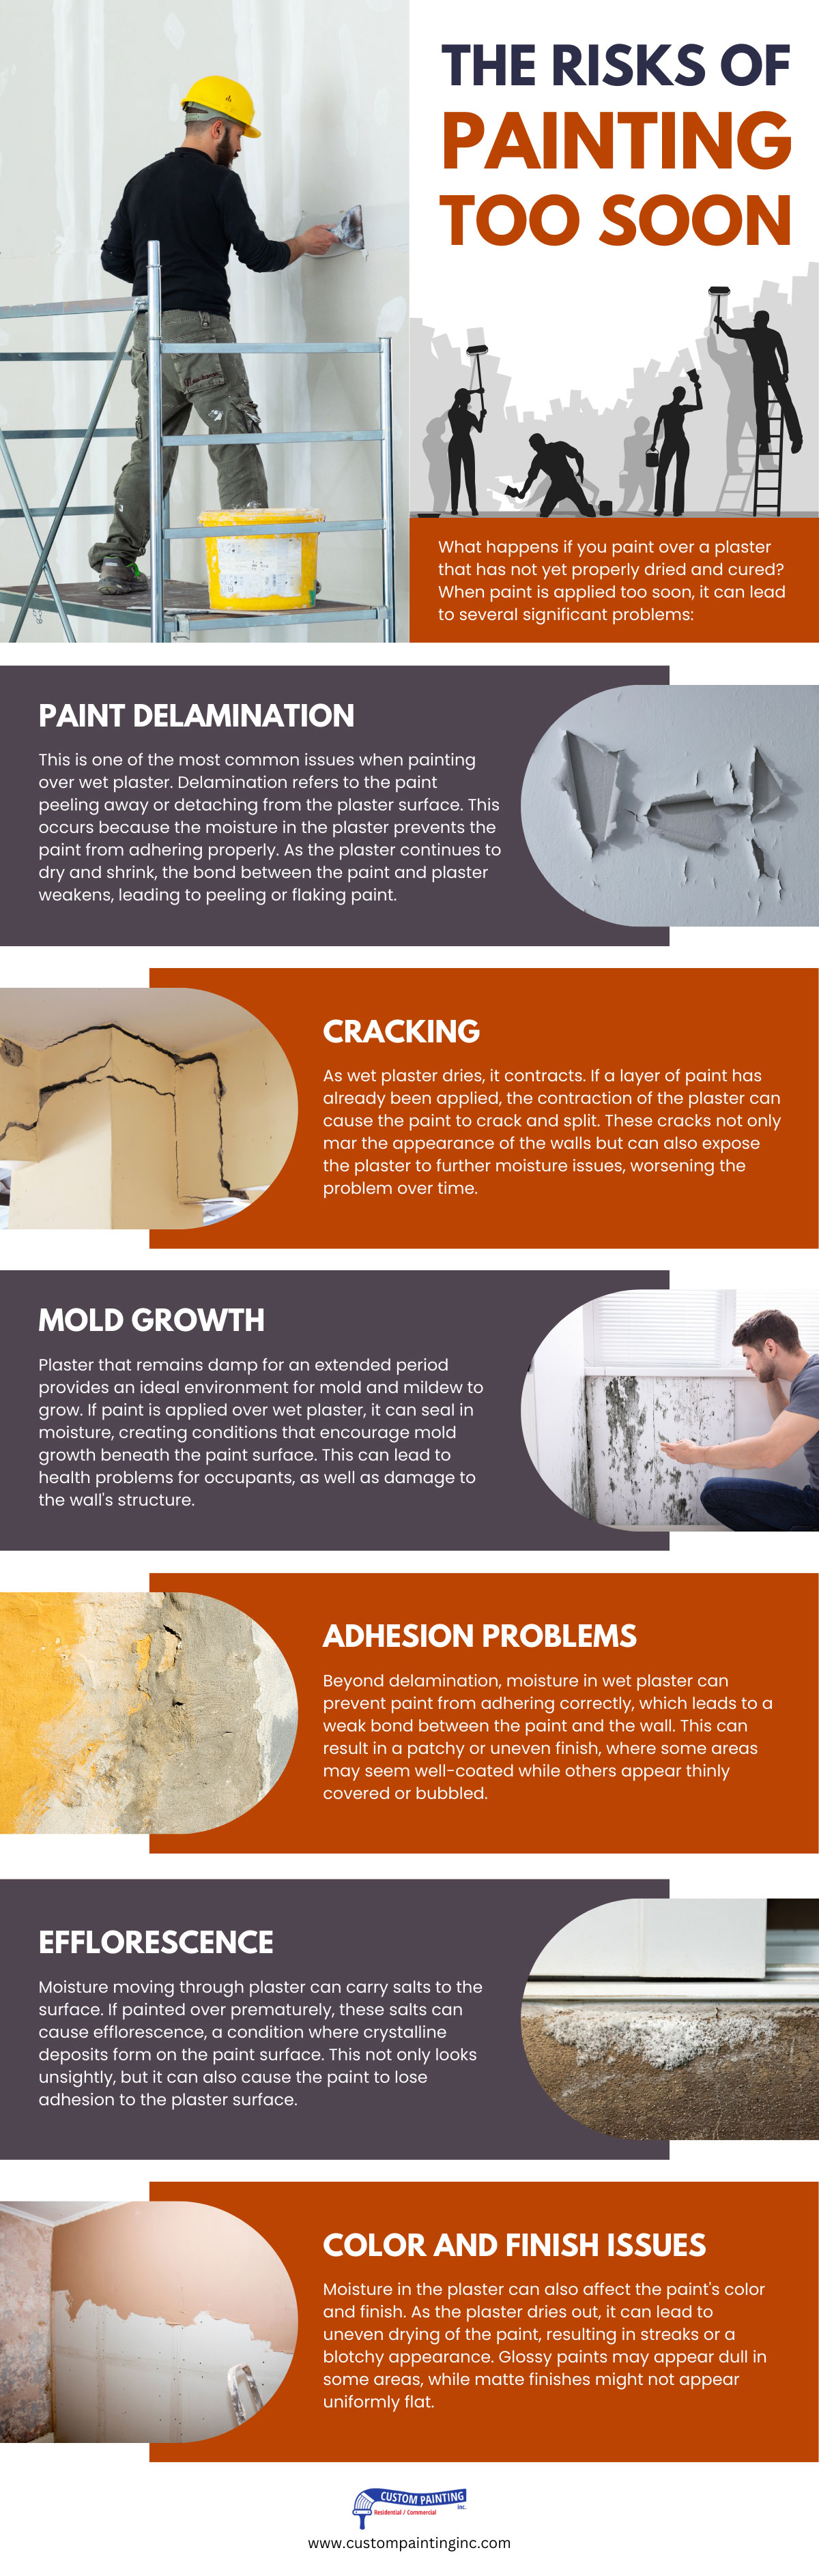
What happens if you paint over a plaster that has not yet properly dried and cured? When paint is applied too soon, it can lead to several significant problems:
- Paint delamination – This is one of the most common issues when painting over wet plaster. Delamination refers to the paint peeling away or detaching from the plaster surface. This occurs because the moisture in the plaster prevents the paint from adhering properly. As the plaster continues to dry and shrink, the bond between the paint and plaster weakens, leading to peeling or flaking paint.
- Cracking – As wet plaster dries, it contracts. If a layer of paint has already been applied, the contraction of the plaster can cause the paint to crack and split. These cracks not only mar the appearance of the walls but can also expose the plaster to further moisture issues, worsening the problem over time.
- Mold growth – Plaster that remains damp for an extended period provides an ideal environment for mold and mildew to grow. If paint is applied over wet plaster, it can seal in moisture, creating conditions that encourage mold growth beneath the paint surface. This can lead to health problems for occupants, as well as damage to the wall’s structure. Mold growth beneath paint may appear as discoloration and can significantly degrade air quality indoors.
- Adhesion problems – Beyond delamination, moisture in wet plaster can prevent paint from adhering correctly, which leads to a weak bond between the paint and the wall. This can result in a patchy or uneven finish, where some areas may seem well-coated while others appear thinly covered or bubbled.
- Efflorescence – Moisture moving through plaster can carry salts to the surface. If painted over prematurely, these salts can cause efflorescence, a condition where crystalline deposits form on the paint surface. This not only looks unsightly, but it can also cause the paint to lose adhesion to the plaster surface.
- Color and finish issues – Moisture in the plaster can also affect the paint’s color and finish. As the plaster dries out, it can lead to uneven drying of the paint, resulting in streaks or a blotchy appearance. Glossy paints may appear dull in some areas, while matte finishes might not appear uniformly flat.
To avoid these problems, it is crucial to ensure that plaster is fully dried and properly cured before painting. This typically involves waiting several days or even weeks, depending on how thick the plaster was applied, ambient temperature, and humidity levels.
Uneven paint finishes and color inconsistencies can detract significantly from the overall appearance of a painted surface, affecting both its aesthetic appeal and perceived quality. Here are some of the common aesthetic issues that can arise, along with their causes:
Uneven paint finish:
- Brush marks and roller strokes – Visible application strokes can lead to a finish that looks unprofessional. This issue often results from using low-quality tools, applying too much or too little paint, or failing to maintain a wet edge during application.
- Runs and sags – Paint that drips or sags creates uneven surfaces and detracts from the smoothness of the finish. This is typically caused by applying too much paint in a single coat or painting on a vertical surface without the proper technique.
- “Orange peel” texture – This describes a surface that resembles the skin of an orange with a slightly bumpy texture. It’s common in spray painting and can result from several factors, including spraying the paint too thickly, using paint that’s too viscous, or spraying at an incorrect distance from the surface.
- Lap marks – These are noticeable differences in the appearance of the paint due to overlapping edges of paint that have partially dried. Lap marks occur when the painter does not maintain a wet edge, causing the overlap of wet and already drying paint.
Color inconsistencies:
- Mismatched colors – Even slight variations in paint color can be noticeable and detract from the uniformity of the painted surface. This can happen when mixing paint from different batches or failing to adequately mix the paint before application.
- Fading and chalking – Over time, paint can fade or begin to chalk due to exposure to sunlight and weather elements, leading to uneven coloration across the surface. The quality of the paint and the pigments used can influence how quickly this occurs.
- Bleeding – Older colors or stains bleeding through the new paint layer can cause color inconsistencies. This is often the result of inadequate surface preparation or failing to use a primer when it’s needed.
- Patchiness – Uneven absorption of paint, especially on porous surfaces, can lead to a patchy appearance. This is often resolved with proper surface preparation and the application of a suitable primer.
Preparing to paint
Here is a step-by-step guide to help ensure your plaster is completely dry and ready for painting:
1. Allow sufficient drying time
New plaster – Typically requires a minimum of 4 weeks to dry completely. This can vary based on environmental conditions like humidity and temperature.
Patch repairs – Smaller repairs may dry faster, often within a few days to a week, depending on the depth of the patch and the ambient conditions.
2. Inspect the color –
Plaster changes color as it dries, usually starting out dark and becoming lighter. A uniform, light color across the surface is a good initial indicator that the plaster is dry.
3. Check for dampness
- Touch test – Gently press your hand against the plaster. It should feel dry and at room temperature. If it feels cool or damp, it needs more time.
- Moisture meter – For a more precise measurement, use a moisture meter specifically designed for plaster. This tool will provide a definitive moisture level, helping you decide if the plaster is dry enough. The acceptable moisture content will depend on the meter’s scale but generally should be close to the ambient moisture level of dry interior walls.
4. Assess environmental conditions –
High humidity and low temperatures slow down the drying process. Use a dehumidifier to reduce humidity and, if possible, slightly increase the room temperature to facilitate drying.
5. Ventilation –
Ensure the room is well-ventilated to allow moisture to escape. Open windows or use fans to circulate air, but avoid direct airflow on the plaster as this can cause uneven drying.
6. Visual Inspection for cracks or damage –
Before painting, inspect the plaster for any cracks, damage, or imperfections. Repair these areas as necessary and allow the repairs to dry fully.
7. Priming –
Once the plaster is fully dry, it is advisable to apply a primer suitable for plaster. This helps to seal the plaster, providing a good base for the paint and ensuring even coverage and color.
8. Patch test painting –
If you are unsure about the dryness, you can do a patch test by applying paint to a small area. Check the test area after it dries for any signs of moisture damage or adhesion issues.
The importance of a well-ventilated space for drying plaster cannot be overstated, as it directly impacts the quality, durability, and safety of the plastering work. Here are several key reasons why ventilation is crucial:
- Moisture control – Plaster needs to dry evenly and gradually to prevent cracking. A well-ventilated area ensures that excess moisture can escape, reducing the risk of structural weaknesses that can occur if the plaster dries too quickly or unevenly.
- Mold and mildew prevention – Adequate ventilation helps prevent moisture buildup, which may lead to the growth of mold and mildew. These can not only damage the plaster but also pose health risks to occupants.
- Strength and durability – Proper drying enhances the strength and durability of the plaster. Without good ventilation, plaster may remain damp internally even if the surface appears dry, leading to long-term issues such as crumbling or failure to adhere properly to surfaces.
- Air quality – The drying process can release volatile organic compounds (VOCs) and other chemicals into the air. Good ventilation ensures these are dispersed, maintaining better air quality and reducing potential health risks to individuals in the vicinity.
- Efficiency and cost-effectiveness – Well-ventilated spaces can reduce the time it takes for plaster to dry, making the construction or renovation process more efficient. This can lead to cost savings and less disruption for the project.
Speeding up the drying process of various items or substances safely involves techniques that minimize risk while effectively reducing moisture. Here are some general tips for various scenarios:
- If appropriate, use direct sunlight to help speed up drying, but be cautious with items that can fade or degrade under UV exposure.
- Utilize absorbent materials such as towels, sponges, or proprietary products designed to soak up moisture.
- In indoor environments, reducing overall humidity with dehumidifiers can help speed up drying times for a wide range of items.
- Position a fan to blow air over the surface to increase evaporation, but avoid high speeds that might cause dust to stick to the surface.
- Apply thin layers of paint. Multiple thin layers dry quicker than one thick layer.
- Use a dehumidifier in the room to reduce humidity and speed up drying.
- Increase the room temperature safely, if possible, as warmth accelerates drying.
Primer: your best friend
Using a primer on new plaster walls is crucial for several reasons:
- It seals the surface.
- It improves adhesion of the topcoat.
- It provides the paint finish with a uniform appearance.
- It hides stains.
- It enhances paint performance and durability.
- It provides a barrier against moisture.
When preparing plaster walls for painting or wallpapering, choosing the right type of primer is essential for a durable and visually pleasing finish. You also have to consider important factors such as the wall’s condition, the type of paint you plan to use, and any specific issues like stains or odors you need to address.
Here are some types of primers suitable for plaster walls, along with their benefits:
- PVA (polyvinyl acetate) primer – This type of primer is specifically designed for sealing plaster walls. It prevents the plaster from absorbing too much paint, leading to a more uniform finish. PVA primer also helps in adhering the paint to the surface, reducing the amount of paint needed and ensuring that the finish lasts longer
- Oil-based primer – Oil-based primers are excellent for sealing and protecting plaster walls, especially if the walls are old and have never been painted. They are particularly good at blocking stains and preventing bleed-through from the underlying material. Oil-based primers also adhere well to the surface, providing a solid base for any type of paint
- Shellac-based primer – Shellac-based primers offer superior stain-blocking capabilities, making them ideal for plaster walls that have been exposed to smoke, water, or other types of stains. They dry quickly and create a hard surface that is excellent for painting. This type of primer is also good for sealing odors.
- Latex primer – Latex primers are water-based and less odorous than oil-based primers, making them more user-friendly and easier to clean up. They offer good adhesion to plaster surfaces and are flexible, which helps prevent cracking. Latex primers are also good to seal porous surfaces and provide a smoother base for paint.
- Acrylic primer – Benefits: Acrylic primers are another water-based option that provides excellent adhesion and durability. They are suitable for new or previously painted plaster walls and work well under a variety of paint types. Acrylic primers are less likely to yellow over time and can help in resisting moisture.
- Stain-blocking primer – For plaster walls with problematic stains or discoloration, a stain-blocking primer can be crucial. These primers are designed to prevent stains from bleeding through the final paint coat, ensuring a clean and uniform appearance. They can be either oil-based or water-based, depending on the specific formulation.
Applying primer to plaster walls before painting is an essential step to ensure a smooth, durable finish. Here’s a step-by-step guide on how to apply primer correctly:
1. Prepare the walls
- Clean the walls – Remove any dust, dirt, or grease from the walls. You can use a damp sponge or cloth and a mild detergent if necessary. Let the walls dry completely.
- Repair damages – Fill any holes or cracks with plaster or a suitable filler. Once dry, sand the repaired areas until smooth.
- Sand the Walls –Lightly sand the entire wall surface with fine-grit sandpaper to ensure the primer adheres well. This step is especially important if the plaster is glossy or has been painted previously.
- Remove Dust – After sanding, remove all dust with a clean, damp cloth or a tack cloth.
2. Apply primer
- Choose the right primer –Use a primer that is suitable for plaster walls. If your walls are new and have never been painted, a plaster sealer or a primer-sealer is recommended to prevent the plaster from absorbing too much paint.
- Tape off areas – Use painter’s tape to protect any areas you don’t want to be primed or painted, like trim, windows, and doors.
- Cut in – Begin by “cutting in” the primer around the edges of the wall with a paintbrush. This means painting a 2 to 3 inch strip along the edges, corners, and any areas where a roller can’t reach.
- Use a roller for large areas – For the main surface of the wall, use a roller. Dip the roller into the primer, removing any excess to avoid drips. Apply the primer using slightly overlapping strokes, starting from the top of the wall and working your way down.
- Apply evenly – Ensure an even application of primer across the wall. Avoid applying too much primer in one area and not enough in another.
- Let it dry – Allow the primer to become completely dry. Check the primer’s instructions for drying times, as it may vary depending on the brand and type.
3. Inspect and apply a second coat if necessary
- Inspect the coverage – Once the primer is dry, check for any uneven areas or spots where the plaster shows through.
- Apply a second coat if needed – If coverage is uneven or insufficient, apply a second coat of primer, following the same steps as before.
Choosing the right paints and tools
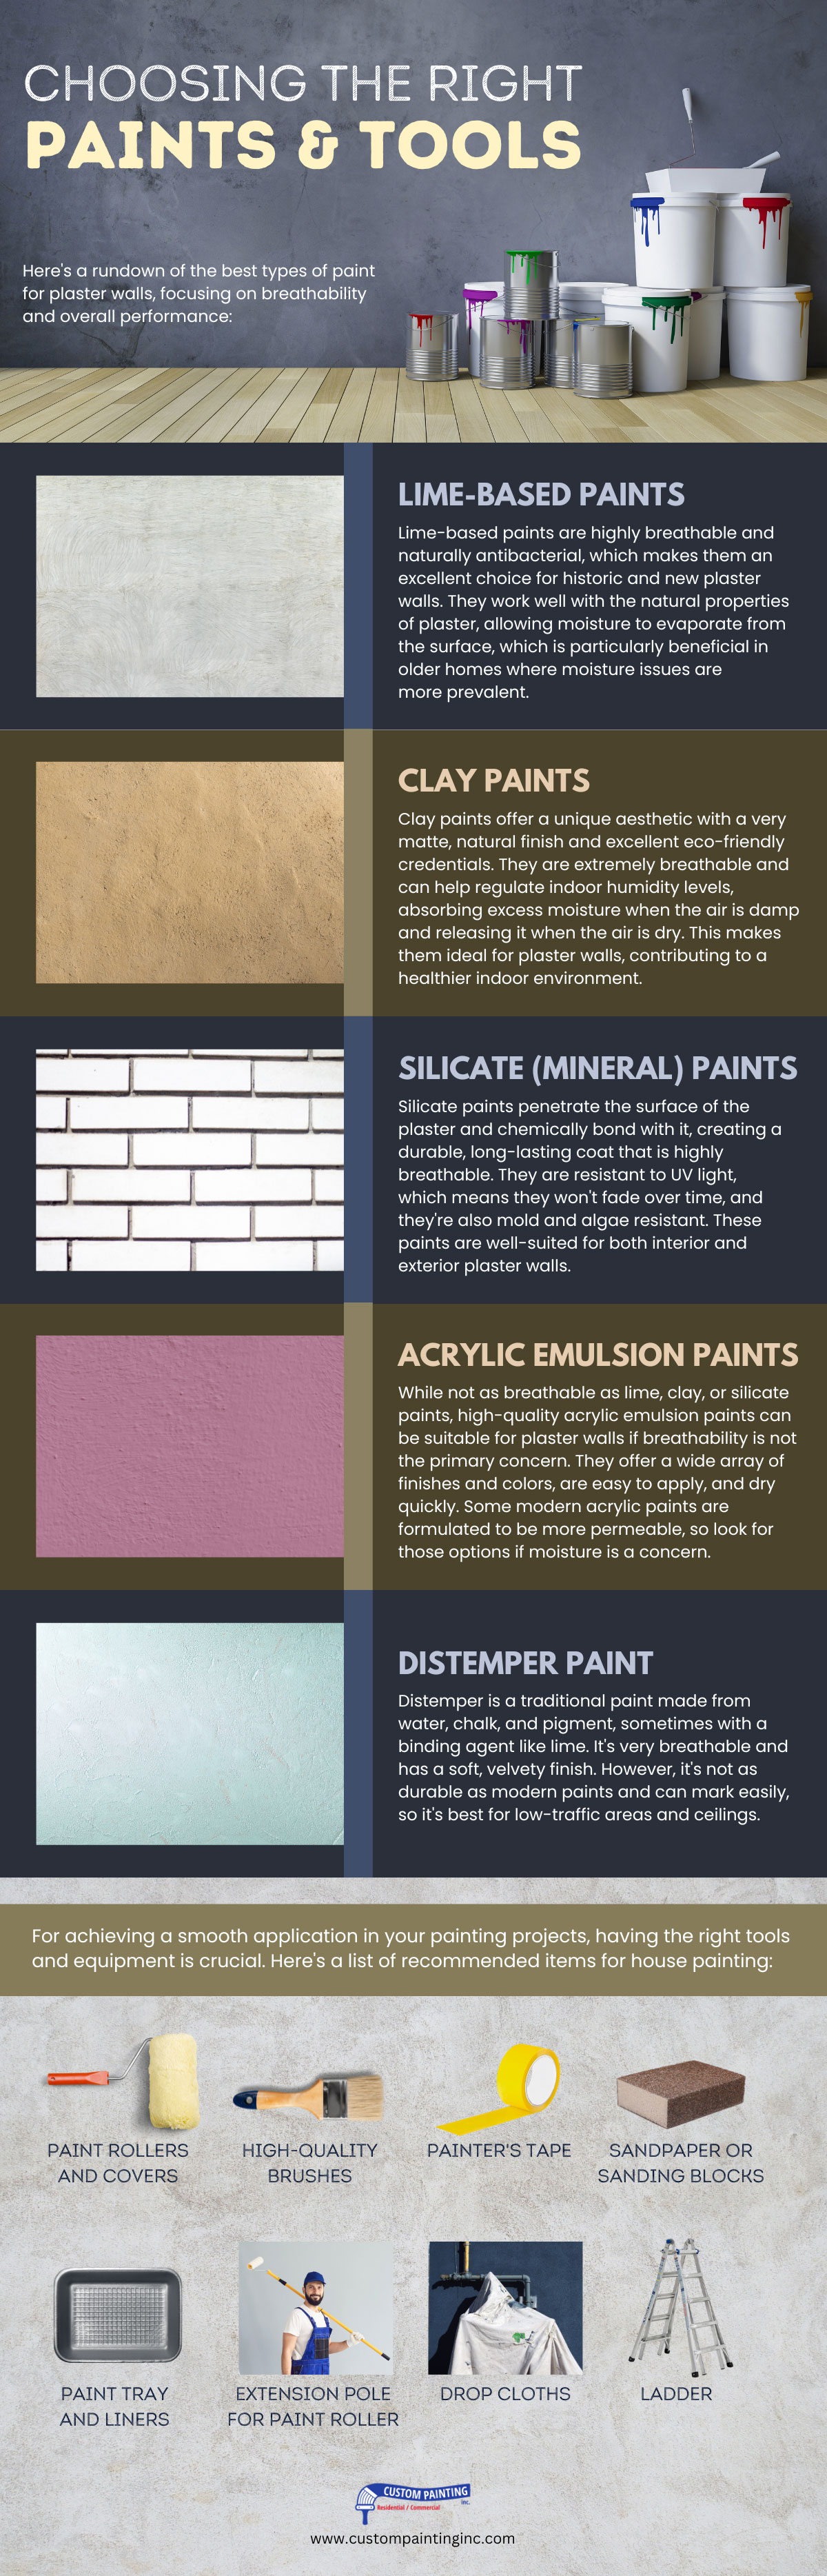
Here’s a rundown of the best types of paint for plaster walls, focusing on breathability and overall performance:
- Lime-based paints – Lime-based paints are highly breathable and naturally antibacterial, which makes them an excellent choice for historic and new plaster walls. They work well with the natural properties of plaster, allowing moisture to evaporate from the surface, which is particularly beneficial in older homes where moisture issues are more prevalent.
- Clay paints – Clay paints offer a unique aesthetic with a very matte, natural finish and excellent eco-friendly credentials. They are extremely breathable and can help regulate indoor humidity levels, absorbing excess moisture when the air is damp and releasing it when the air is dry. This makes them ideal for plaster walls, contributing to a healthier indoor environment.
- Silicate (mineral) paints – Silicate paints penetrate the surface of the plaster and chemically bond with it, creating a durable, long-lasting coat that is highly breathable. They are resistant to UV light, which means they won’t fade over time, and they’re also mold and algae resistant. These paints are well-suited for both interior and exterior plaster walls.
- Acrylic emulsion paints – While not as breathable as lime, clay, or silicate paints, high-quality acrylic emulsion paints can be suitable for plaster walls if breathability is not the primary concern. They offer a wide array of finishes and colors, are easy to apply, and dry quickly. Some modern acrylic paints are formulated to be more permeable, so look for those options if moisture is a concern.
- Distemper paint – Distemper is a traditional paint made from water, chalk, and pigment, sometimes with a binding agent like lime. It’s very breathable and has a soft, velvety finish. However, it’s not as durable as modern paints and can mark easily, so it’s best for low-traffic areas and ceilings.
For achieving a smooth application in your painting projects, having the right tools and equipment is crucial. Here’s a list of recommended items for house painting:
- Paint rollers and covers
- High-quality brushes
- Painter’s tape
- Sandpaper or sanding blocks
- Paint tray and liners
- Extension pole for paint roller
- Drop cloths
- Ladder
Painting new plastered walls: step-by-step guide
After ensuring the plaster has dried and priming the newly plastered walls, now it’s time to paint them! Here’s a step-by-step guide to help you through the process:
1. Apply the top coats:
- Paint choice – Use a water-based emulsion for the final coats. You may need two or more coats to achieve the desired opacity and finish.
- Technique – Apply each coat with a roller in a uniform direction, using a brush for edges and corners. Allow each coat to dry completely before you apply the next. Drying times can vary based on paint type and environmental conditions.
2. Do the finishing touches:
Check the walls for any missed spots or uneven areas after the final coat has dried. Then, use a small brush for any necessary touch-ups.
Additional tips:
- Keep the room well-ventilated during the painting process to aid in drying and to reduce paint fumes.
- Good lighting is important to spot any painting imperfections.
Following the steps above should help you achieve a professional-looking finish on your newly plastered walls. Take your time with each step to ensure the best possible outcome.
Aftercare and maintenance
Caring for freshly painted plaster walls is important to maintain the appearance and longevity of your paint job. Here are some tips to help you take care of your newly painted plaster walls:
- Allow proper drying time – Fresh paint on plaster walls needs time to cure fully. Typically, it can take up to 2 to 4 weeks for paint to cure completely, but this can vary based on the type of paint used and the environmental conditions. Avoid touching or washing the walls during this period to prevent damage.
- Avoid humidity – High humidity can adversely affect the drying and curing process of paint. Try to keep the room well-ventilated and maintain a moderate temperature to help the paint cure properly.
- Clean gently – Once the paint has fully cured, you can clean the walls as needed. Use a soft, damp cloth to gently wipe away dust or dirt. Avoid harsh chemicals or abrasive cleaners because they can damage the paint surface.
- Address spills immediately – If something gets spilled on the wall, clean it up as soon as possible to prevent staining. Blot up spills gently with a damp cloth without rubbing, which could smear the spill or damage the paint.
- Touch-up as needed – If you notice any chips, cracks, or scratches, touch them up with leftover paint to keep the walls looking fresh. Use a small brush for precision and try to blend the touched-up area with the surrounding wall.
- Protect from furniture and sunlight – Keep furniture and other objects a slight distance away from the walls to prevent scratches and scuffs. Additionally, if you live in a sunny location, be aware prolonged exposure to direct sunlight can fade painted surfaces over time, so consider using window treatments to protect your walls from UV damage.
- Use the right paint for repainting – If you decide to repaint the walls in the future, make sure to use paint that is compatible with the existing type. Preparing the surface properly before applying new paint will ensure the best results.
- Dust regularly – Regular dusting can prevent build-up that might stick more firmly to the wall over time. Use a duster or soft, dry cloth to gently remove surface dust.
Following these tips will help ensure that your freshly painted plaster walls remain in excellent condition for years to come. Always refer to the paint manufacturer’s specific care instructions for the best results, as some types of paint may have unique requirements.
When painting new plaster walls, there are several common issues to watch out for in the first few months. They could affect the appearance and longevity of the paint job if not properly addressed:
- Drying and curing time – Plaster needs to be fully dry before painting, which can take several weeks depending on the thickness and environmental conditions. Painting over damp plaster can lead to paint discoloration, peeling, or blistering.
- Efflorescence – This is a condition where salt deposits form on the surface of the plaster as it dries, leading to a white, powdery residue. If painted over, it can cause paint to flake off. Removing efflorescence before painting is crucial.
- Cracking and shrinkage – As new plaster dries, it may shrink and form cracks. These should be filled and smoothed over before painting to ensure a flat, uniform surface.
- Poor adhesion – Paint may not adhere properly to smooth, unprimed plaster. Using a primer specifically designed for new plaster can improve paint adhesion and result in a more durable finish.
- Moisture damage – If the underlying plaster remains damp or if there’s high humidity, paint may bubble or peel. Ensuring proper ventilation and that the plaster is completely dry can prevent these issues.
- Mismatched absorption – Different absorption rates between patched areas and the original plaster can lead to an uneven finish. A mist coat (a watered-down layer of paint) as the first coat can help to unify the absorption rates across the wall.
- Mold and mildew – In areas with high moisture, such as bathrooms or kitchens, painted plaster walls may develop mold or mildew. Using mold-resistant paint or adding a mold inhibitor to your paint can help prevent this.
- Color inconsistency – Inconsistencies in plaster drying or variations in texture can lead to noticeable color differences after painting. Applying an additional coat of paint or using a high-quality primer can help achieve a consistent color.
To avoid these issues, proper preparation of the plaster walls before painting is key. This includes ensuring the plaster is fully dry, applying a suitable primer, using the correct type of paint, and addressing any surface imperfections. Regular checks in the months following painting can also help catch and rectify any emerging problems early.
When to call a professional
Hiring a professional painter to paint freshly plastered walls can be beneficial in several scenarios, ensuring optimal results and avoiding potential issues. Here are some situations where opting for a professional might be the better choice:
- High-quality finish
- Ability to deal with complex surfaces or designs on walls
- Speed and efficiency
- Knowledge of materials
- Ability to deal with problematic walls (such as bumps from an improperly plastered surface)
- Safety
- Warranty and insurance
- Stress reduction
- Value for money
In these scenarios, the benefits of hiring a professional painter often outweigh the cost, ensuring a stress-free process with excellent results.
Choosing a reputable painting contractor involves several steps to ensure you get quality service, value for your money, and a satisfying outcome for your painting project. Here’s a guide to help you through the process:
Do your research:
Ask for recommendations: Start by asking friends, family, or neighbors for recommendations of contractors they have used and were satisfied with.
Online reviews and ratings: Check online platforms like Yelp, Google, Angie’s List, or the Better Business Bureau for ratings, reviews, and any complaints about contractors you’re considering.
Verify credentials:
License and Insurance: Ask the contractor if they are licensed to work in your area and carries liability insurance and worker’s compensation insurance. These insurances protect you in case of accidents or damage.
Professional Associations – Membership in trade or professional associations like the Painting Contractors Association (PCA) can be a sign of a reputable contractor.
- Experience and Portfolio – Look for a contractor with several years of experience. Ask to see a portfolio of their work or for addresses of their recent projects that you can check out in person.
- Get multiple estimates – Aim to get at least three estimates to compare prices, but don’t make your decision based on price alone. The cheapest option is not always the best.
Ask the right questions:
When meeting with potential contractors, ask about their process, the materials they use, the number of coats of paint included, how they plan to protect your property, and how they manage cleanup.
Inquire about the timeline for completion and the size of the crew.
Check references:
A reputable contractor should have a list of previous clients you can contact. Reach out to these references to ask about their satisfaction with the work, timeliness, and professionalism.
Review the contract:
Before signing a contract, read it carefully. It should include all necessary details about the scope of work, the materials to be used, timelines, payment schedules, and how changes to the contract will be handled.
Warranty and follow-up:
Ask about the warranty on the work performed. A reputable contractor should stand behind their work and offer a guarantee against peeling, fading, or chipping.
Communication:
Ensure the contractor communicates well and makes you feel comfortable. Good communication is one of the most important keys to a successful project.
Trust your instincts:
Finally, trust your instincts. If something feels off about a contractor, it’s better to keep looking.
Conclusion
It is possible to paint over new plaster. But since this is different to painting regular drywall, there are a few factors you need to consider before doing so. Painting plaster is a process that requires a little patience and assiduous attention to detail. If you don’t approach this job in the correct way, you might end up with a less satisfactory finish.
Painting freshly applied plaster on walls takes more time and care. So, rushing the paint process can lead to multiple problems, which you might end up repeating anyway.
If you want to get the painting over a newly plastered wall right on the first go, it is best to hire a professional house painting in Pleasant Hill, CA contractor to do the job. Give Custom Painting, Inc. a call or message! Call 925-294-8062 or message here today.