Introduction
Repainting semi-gloss walls involves several unique challenges, which stem from the properties of semi-gloss paint and the requirements for achieving a smooth, professional-looking finish.
Semi-gloss walls are smoother and shinier than matte or flat finishes, making the adhesion of new paint layers more difficult. Proper surface preparation is crucial for house painting in Concord, CA, to ensure the new paint adheres properly. This step often involves thorough cleaning, sanding to create a slightly rough surface, and sometimes applying a primer designed for glossy surfaces.
Understanding semi-gloss paint
Semi-gloss paint is a type of finish with a moderate level of sheen, less than gloss paints’ but more than matte or eggshell finishes. It strikes a balance between visually appealing and practical in terms of maintenance. Here are its key properties and common uses:
Properties
- Reflectivity – Semi-gloss paint reflects light moderately, which can help brighten up a space and make it appear larger.
- Durability – It is more durable and washable than flat or matte paints, making it easier to clean and maintain.
- Moisture resistance – Semi-gloss finishes have good moisture resistance, making them suitable for high-humidity areas.
- Stain resistance – The finish is more resistant to stains, and you can wipe off the marks easily without leaving residue.
- Application – While it’s more forgiving than high-gloss finishes, semi-gloss paint can still show imperfections in the wall or application, so proper surface preparation is crucial.
Common uses
- Kitchens and bathrooms – Its moisture resistance makes it a popular choice for walls in kitchens and bathrooms where humidity and the potential for splashes and stains are high.
- Trim and woodwork – Semi-gloss is often used for doors, trims, moldings, and cabinets due to its durability and aesthetic contrast against a less shiny wall.
- High-traffic areas – For hallways or children’s rooms requiring frequent cleaning, semi-gloss paint offers a practical solution.
- Accent features – You can use semi-gloss paints to highlight architectural features or furniture due to its subtle shine that attracts the eye without overwhelming the space.
Why can semi-gloss surfaces be tricky to repaint?
Semi-gloss paint combines aesthetic appeal with practicality, making it versatile for various home and commercial applications. Its balance of sheen and durability caters to decorative and functional needs, providing a clean, vibrant look that is easy to maintain.
However, surfaces painted with semi-gloss can be challenging to repaint due to their smooth and shiny finish, which makes it harder for new paint to adhere properly. This surface finish doesn’t provide much grip for the new paint, potentially leading to uneven coverage, streaking, or peeling if the surface isn’t adequately prepared beforehand.
Proper preparation often involves a thorough cleaning, light sanding to create a slightly rough texture, and sometimes applying a primer designed for glossy surfaces to ensure the new paint adheres well and looks smooth and even.
Initial assessment
Inspecting semi-gloss walls for damage, imperfections, or greasy spots
Conducting an initial assessment of walls painted with semi-gloss paint before painting over them is crucial for several reasons:
- Adhesion – Semi-gloss paint has a smoother and less porous surface than matte or flat paints, making it more challenging for new paint to adhere properly. Evaluating the existing paint can help you determine the need for specific primers or surface preparation methods to ensure the new paint adheres well.
- Surface condition – The assessment helps identify any cracks, peeling, or other imperfections on the surface. Semi-gloss finishes can highlight imperfections more than flatter finishes, so repair and smooth out any issues before repainting to achieve a flawless finish.
- Cleanliness – Semi-gloss walls are often used in areas prone to moisture or where easy cleaning is desired, such as kitchens and bathrooms. Over time, they can accumulate grime, oils, and other residues. A thorough assessment allows you to determine the cleaning needed to ensure the new paint can bond well to the surface without issues.
- Color and coverage – If you plan to apply a lighter color over a darker semi-gloss coat, the initial assessment can help you decide on the number of coats needed or if a tinted primer is necessary. Doing so can save time and resources by preventing the need for multiple coats of paint.
- Compatibility – Different types of paint have different compositions (oil-based vs. water-based). Assessing the current paint type is essential because painting over oil with water-based paint without proper preparation can lead to problems with adhesion. The assessment can guide the selection of the correct paint type and preparation techniques.
Paint over or strip?
Deciding whether to strip existing semi-gloss paint or paint over it depends on the condition of the current paint and the desired outcome for your project. Both approaches have their merits, so let’s explore them:
Painting over semi-gloss paint
Pros:
- Time and effort – Painting over existing semi-gloss paint is less labor-intensive and quicker than stripping the paint.
- Cost-effective – It requires fewer materials, as you might only need a primer and paint, saving on the cost of a paint stripper and additional tools.
- Good for solid surfaces – If the existing semi-gloss paint is in good condition (no peeling, cracking, or significant damage), painting over it can be an effective solution.
Cons:
- Surface preparation – Semi-gloss surfaces must be adequately sanded to ensure the new paint adheres well. Skipping or skimping on this step can lead to poor paint adhesion and longevity.
- May conceal problems – Painting over may hide underlying issues like moisture damage, which could worsen over time.
Stripping semi-gloss paint
Pros:
- Fresh start – Stripping off the old paint provides a clean slate, which is particularly beneficial if the existing surface has numerous imperfections.
- Better adhesion – A stripped surface can offer better adhesion for the new paint, especially if you’re changing the type of paint or repairing the surface.
- Long-term solution – It can be more durable in the long run, as you’re removing layers that might have been prone to peeling or cracking.
Cons:
- Labor-intensive – Stripping paint is time-consuming and requires significant effort, especially with a large surface area.
- Cost – It can be more expensive due to the need for additional materials like a paint stripper, protective gear, and possibly professional assistance.
- Safety and health risks – Chemical strippers can be hazardous, necessitating proper ventilation, protective clothing, and careful handling.
Ultimately, the decision largely depends on your specific situation:
- For high-quality, long-lasting results, especially in areas of high visibility or wear, stripping the old paint might be worth the extra effort.
- For quick refreshes or if the existing paint is in good condition, painting over it after proper preparation can be equally satisfactory.
Cleaning the walls
Cleaning the walls is crucial for achieving a smooth, flawless finish. Here are the steps and details to guide you through this process:
1. Lighting and visibility
- Adequate lighting – Ensure the room is well-lit. Use additional light sources like work lights to highlight the walls from different angles. Imperfections are more visible under intense sunlight.
- Visual inspection – Perform a thorough visual inspection of the walls. Look for noticeable defects, color inconsistencies, and areas that reflect light oddly, indicating possible surface imperfections.
2. Surface cleanliness
- Dust and cobwebs – Use a duster or a clean, dry cloth to remove dust and cobwebs. Pay special attention to corners and the area near the ceiling.
- Greasy spots and stains – Identify greasy spots, stains, or areas with adhesive residue. These areas will need special attention during the cleaning process.
3. Identifying damage and imperfections
- Cracks and holes – Look for cracks, nail holes, or other surface flaws. These will need to be filled with spackle or a suitable filler.
- Dents and scratches – Identify dents, scratches, or gouges on the surface. Some might only need light sanding, while others may require filling.
- Peeling paint – Check for peeling or flaking paint. Areas with loose paint should be scraped and sanded smoothly.
4. Cleaning
- Grease and oil – Clean greasy spots with a mild detergent and water solution, or use a degreaser for tougher spots. Rinse the area well and let it dry completely.
- General cleaning – A mild detergent and water solution can be used for general cleaning. Avoid soaking the walls. Rinse with clean water and allow to dry.
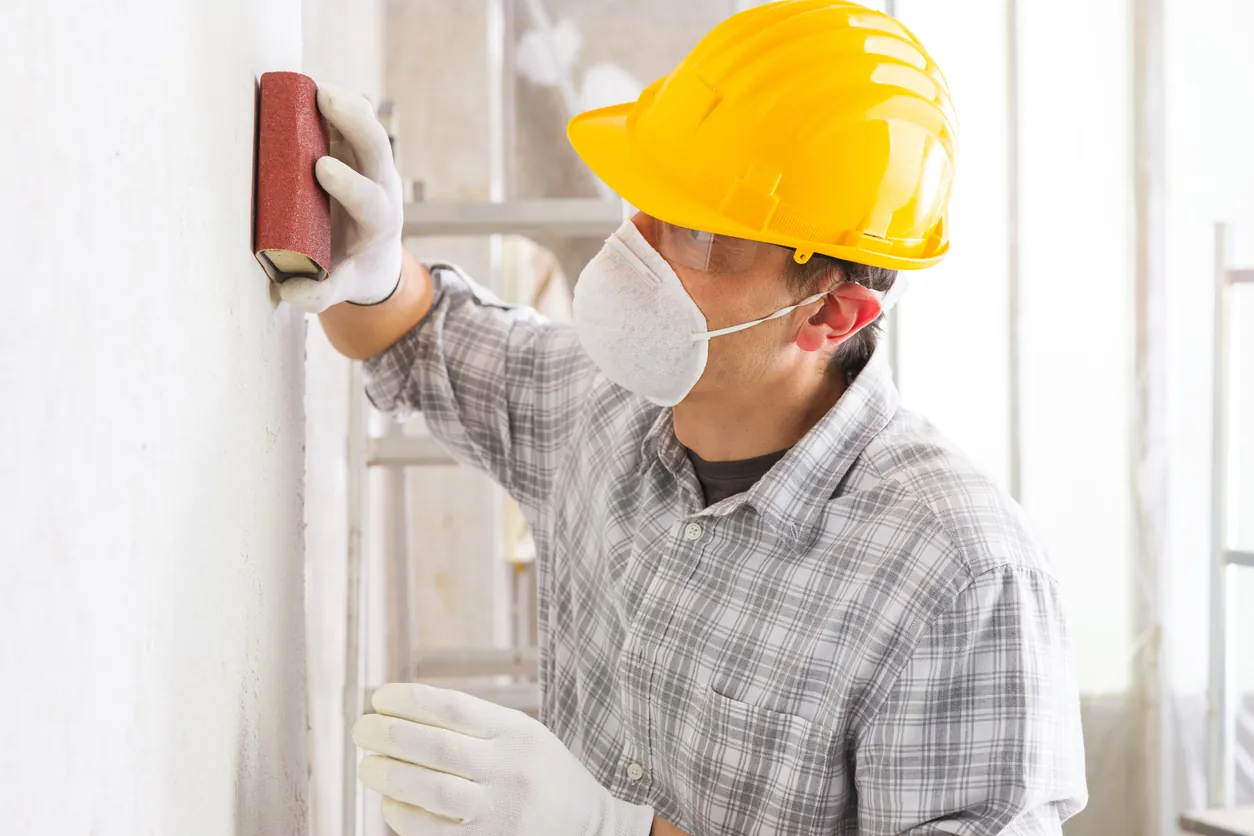
Sanding the surface
The role of sanding in paint preparation
Sanding helps remove imperfections on surfaces or roughen surfaces that are too sleek or glossy for the paint or other topcoat to adhere easily. This step is particularly useful when painting over surfaces with semi-gloss paint.
Tips for sanding semi-gloss surfaces for repainting
Sanding semi-gloss surfaces before repainting is essential to ensure that the new paint adheres properly and results in a smooth, even finish. Here are some tips to help you achieve the best results:
- Choose the right grit sandpaper – Start with medium–grit sandpaper (around 120-150 grit) for initial sanding. It will efficiently scuff up the semi-gloss surface without creating deep scratches that might show through the new paint. You can follow up with a finer grit (180-220) for a smoother finish if necessary.
- Clean the surface – Before sanding, clean the surface thoroughly to remove any dirt, grease, or other contaminants. A clean surface will prevent sandpaper from clogging and ensure more effective sanding. Use a degreaser or a mild detergent solution, rinse with clean water, and allow the surface to dry completely.
- Sand evenly – Use even pressure as you sand, moving in the direction of the grain if you’re working on wood. Doing so will help prevent uneven surfaces or visible scratches. A sanding block for flat surfaces can help maintain even pressure and avoid indentations.
- Dust off – After sanding, remove dust from the surface with a clean, dry cloth or tack cloth. Dust left on the surface can interfere with paint adhesion and result in a rough finish.
Safety precautions and recommended tools
Sanding semi-gloss surfaces requires safety measures to protect yourself from dust and debris and the appropriate tools to achieve a smooth, even finish. Here’s a rundown of the key safety precautions and recommended tools:
Safety precautions
- Dust mask or respirator – Always wear a dust mask or a respirator to prevent inhaling fine dust particles. For more toxic materials, a respirator with proper filtration is recommended.
- Eye protection – Use safety goggles to protect your eyes from dust and small particles.
- Hearing protection – If using power sanders, hearing protection such as earplugs or earmuffs is advisable due to the high noise levels.
- Gloves – Wear gloves to protect your hands from splinters and abrasions.
- Proper ventilation – Ensure the area is well-ventilated to disperse dust. Use a dust extraction system or a fan to help remove dust from the air.
- Skin protection – Wear long sleeves and pants to minimize skin exposure to dust, especially when working with materials that can cause irritation or allergic reactions.
Recommended tools
- Sanding block – For manual sanding, a sanding block helps apply even pressure and prevents rounding over edges. It’s ideal for smaller projects or detailed work.
- Orbital sander – An orbital sander can save time and effort for larger surfaces. It’s less aggressive than a belt sander, making it suitable for finishing touches on semi-gloss surfaces.
- Sanding sponge – A sanding sponge can easily conform to the piece’s shape for contoured or detailed areas. They’re great for getting into nooks and crannies.
- Sandpaper grits – Start with a coarser grit to remove the gloss and finish with a finer grit for a smooth surface. Grits from 120 to 220 are commonly used for prep work on semi-gloss surfaces.
- Dust collector or shop vac – If using power tools, connect them to a dust collector or shop vac to minimize airborne particles.
- Tack cloth – After sanding, use a tack cloth to remove any remaining dust from the surface before applying a new finish.
Repairing imperfections
We all know that painting over cracks and holes is not a good idea. Without proper preparation and priming, these flaws will show through the new paint, making the surface look messy and unfinished. So, inspect your walls first for cracks, nail or screw holes, or dents from furniture or door handles.
Materials and tools:
- Wall filler, such as spackle or joint compound
- Putty knife
- Fine-grit sandpaper
1. Repairing
- Filling – Use spackle or joint compound to fill holes and cracks. Apply smoothly, level with the wall surface, and allow to dry according to the product instructions.
- Sanding – Once the filler is dry, sand the area smoothly, blending into the surrounding wall. Use fine-grit sandpaper and be cautious not to over-sand.
2. Final inspection and prep
- Tactile inspection – After visual inspection and repairs, lightly run your hands over the walls to feel any imperfections that may not be visually apparent.
Applying primer
Why is a good primer necessary to cover and repaint semi-gloss surfaces?
A good primer is essential for ensuring the new paint adheres well, looks uniform, and lasts longer when repainting semi-gloss surfaces.
Semi-gloss surfaces are smooth and non-porous, making it difficult for new paint to adhere properly. A good primer provides a surface that the new paint can bond with more effectively, ensuring better adhesion and longevity of the new paint job.
Applying primer also helps improve the new paint’s durability and achieve a more consistent and smooth appearance in the final paint job.
Also, if you are changing the color of a surface, especially to a lighter color, a primer can help block the original color from showing through. This means you may need fewer coats of the new paint, saving time and resources.
Choosing the right primer for your specific painting project
Selecting the correct primer for painting walls is crucial for achieving a durable and visually appealing finish. Here are the main factors to consider:
- Surface material – Various materials require specific primer types. For example, wood, masonry, and metal each have primers formulated to best adhere to and protect their surfaces.
- Surface condition – A primer must address surface issues like peeling, flaking, cracking, or mildew. There are primers designed to seal, bond, or resist mildew.
- Paint compatibility – Ensure the primer is compatible with the type of paint you plan to use. Water-based (latex) and oil-based paints sometimes require different types of primers.
- Topcoat color – Using a tinted primer closer to the color of the topcoat can enhance color coverage and reduce the number of topcoat layers needed.
- VOC content – Consider the volatile organic compound (VOC) content for health and environmental reasons. Low-VOC or VOC-free primers are available.
- Manufacturer recommendations – Follow the paint manufacturer’s recommendations for the best results, as some primers and paints are formulated to work together.
Tips for applying primer evenly and efficiently
Once you’re done cleaning and repairing the surface, it’s time to prime it for painting:
1. Applying the primer
- Spot priming – Apply primer to repaired areas to ensure even paint adhesion and color.
- Full wall priming – In cases of extensive repairs or if paint colors change drastically, consider priming the entire wall to ensure a uniform finish.
2. Application methods
- Brushing – Dip the brush into the primer and tap it against the side of the can or bucket to shake off the excess. Then, start applying the primer to the surface with long and even strokes, working in one direction. Ensure to use the primer evenly without leaving any brush strokes. Otherwise, smooth them out with your paintbrush.
- Rolling – Pour the primer into the paint tray and dip the roller into the primer. Then, roll the primer onto the surface with long and even strokes. Start rolling from the top and work your way down. Ensure to roll the primer evenly without leaving any roller marks.
3. Drying
- Allow the primer to dry completely, following the manufacturer’s instructions. Typically, the primer will take 4 to 6 hours to dry, but it may vary depending on the primer you’re using and your room’s temperature and humidity levels.
Taping and protecting areas
Using painter’s tape to protect surfaces from being painted
Using painter’s tape is a great way to safeguard trim, ceilings, and other areas from paint drips or overspray when painting. Here’s a step-by-step guide on how to use it effectively:
- Choose the right tape – Make sure you have the right painter’s tape. Blue or green tapes are most commonly used because they are designed to prevent paint from bleeding through and can be easily removed without leaving a residue or damaging the surface.
- Clean surfaces – Before applying the tape, clean the surfaces where the tape will be applied. Use a damp cloth to wipe down trim, ceilings, and other areas to remove dust and dirt. This ensures the tape adheres properly.
- Apply tape smoothly – When applying the tape, start at one end and slowly unroll it to the other end, pressing down firmly as you go. Use your fingers or a putty knife to press the edge of the tape firmly against the surface to prevent paint from seeping underneath.
- Seal edges – Once the tape is applied, run a putty knife or a credit card along the edge to ensure it is fully adhered to the surface. This creates a tight seal that prevents paint from bleeding through.
- Use short strips for curves – If you need to tape around curves or intricate details, use shorter pieces and overlap them slightly to maintain a consistent barrier.
Covering floors and furniture to prevent paint splatters
- After taping off surfaces, cover floors and furniture with drop cloths to protect from paint spills and splatters.
Selecting the right paints and tools
Tips on choosing the best paint type for your project
Choosing the best interior paint type involves considering several factors to ensure the paint meets your aesthetic preferences, durability requirements, and maintenance needs. Here’s brief advice to guide your decision:
- Finish – Choose a paint finish based on the room’s function and your desired durability. Options range from matte (no shine, great for hiding imperfections but less durable) to gloss (highly durable and easy to clean, best for trim and areas with high traffic). Eggshell and satin are good middle-ground wall options due to their moderate sheen and easier cleaning than matte.
- Paint type – Water-based paints (latex) are popular due to their ease of use, quick drying times, and low VOCs (Volatile Organic Compounds), making them more environmentally friendly. Oil-based paints are more durable and stain-resistant but have longer drying times and higher VOC levels. Consider water-based paints for most interior walls and oil-based for trim and areas needing higher durability.
- Color – Test paint colors in the intended space to see how they look under different lighting conditions throughout the day. Purchase small samples to paint swatches on the wall or use peel-and-stick samples if available.
- Quality – Invest in high-quality paint for better coverage, durability, and finish. Higher quality paints may be more expensive initially but can save money and effort in the long run due to fewer coats required and longer intervals between repaints.
- Primer – Decide whether you need a separate primer or a paint-and-primer-in-one product. A separate primer is essential for covering dark colors, blocking stains, or painting on new drywall. Paint-and-primer combos work well for re-painting over similar or lighter colors and when the walls are in good condition.
- Health and safety – Look for paints with low or no VOCs to minimize health risks and environmental impact. This is especially important in enclosed spaces and for homes with children, the elderly, or those with respiratory issues.
- Brand and reviews – Research customer reviews to gauge performance and satisfaction with specific paint types and finishes. Brand reputation can be a good indicator of quality and customer support.
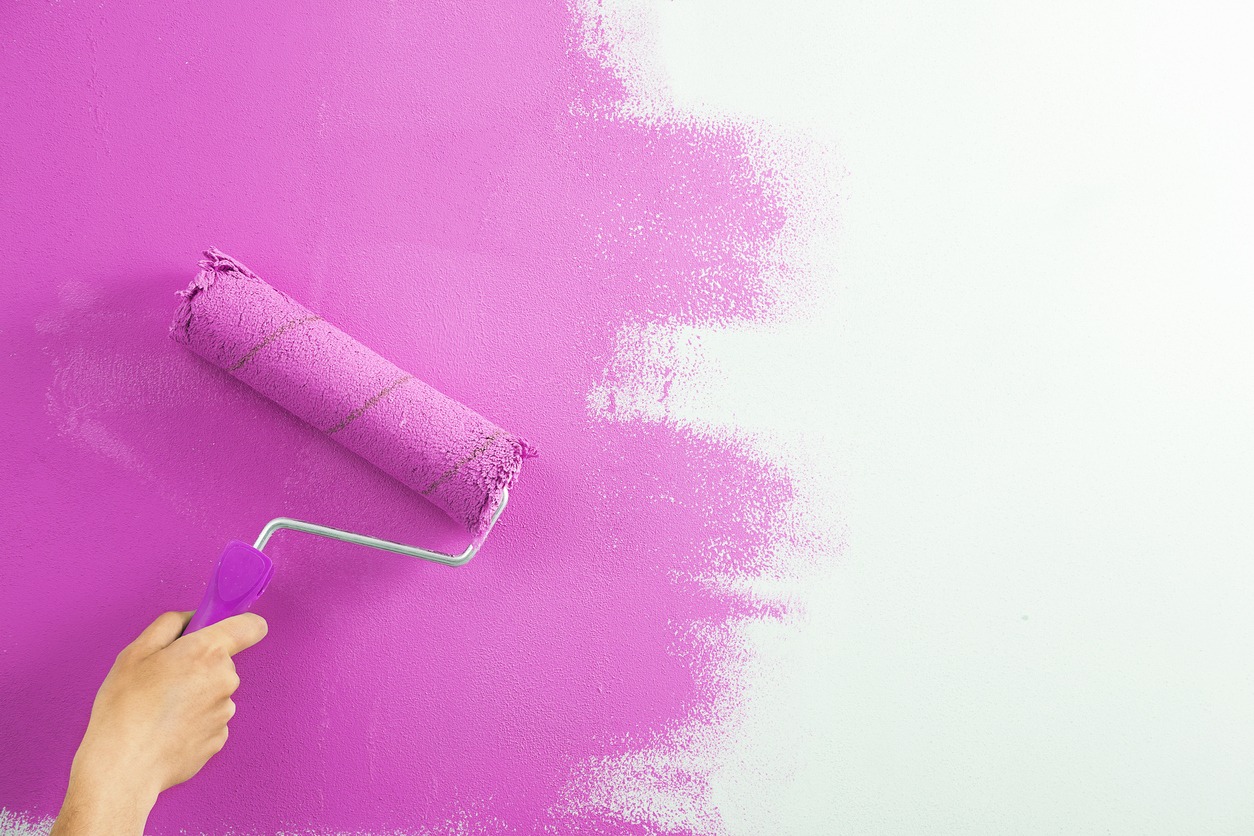
Application techniques
Techniques for applying paint over primer for a smooth finish
Once the primer has dried completely, now it’s time to paint. There are two paint applications you can choose, very much like applying primer:
- Brushing – Dip the brush into the paint and tap it against the side of the paint can or bucket to remove the excess. Then, apply the paint to the surface with long and even strokes, working in one direction. Make sure to apply the paint evenly without leaving any brush strokes. Otherwise, smooth them out with your brush.
- Rolling – Pour the paint into the tray and dip the roller into the paint. Start rolling the paint onto the surface with long and even strokes. Start rolling from the top and work your way down. Ensure you roll the paint evenly without leaving any roller marks.
Conclusion
Painting over semi-gloss walls is not difficult and not that different from painting over flat-painted walls. However, it does require a fair amount of time, effort, and preparation to produce a surface for the new paint to adhere to, resulting in a clean, smooth, and consistent paint finish.
The goal is to get the new paint to adhere to the surface without removing the existing glossy paint, which the new paint doesn’t usually stick to without proper preparation. Cleaning, sanding, and priming the walls are crucial to get the new paint to adhere properly, ensuring a clean, uniform, and durable finish. Preparation is something you should not neglect when painting over a semi-gloss surface.
Custom Painting, Inc. will exceed your expectations for residential painting with our quality and professionalism when you need house painting in several Bay Area cities. In over 40 years in the business, our goal has been to ensure every customer is satisfied with our painting job. Call us at 925-294-8062 or complete our estimate request form to get started!