
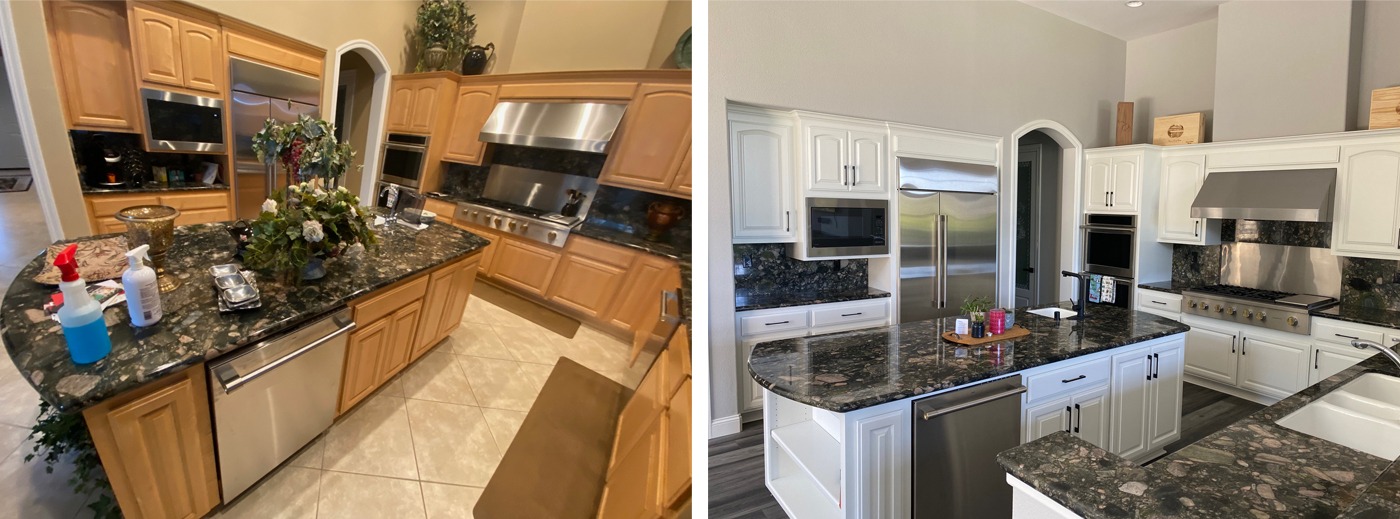
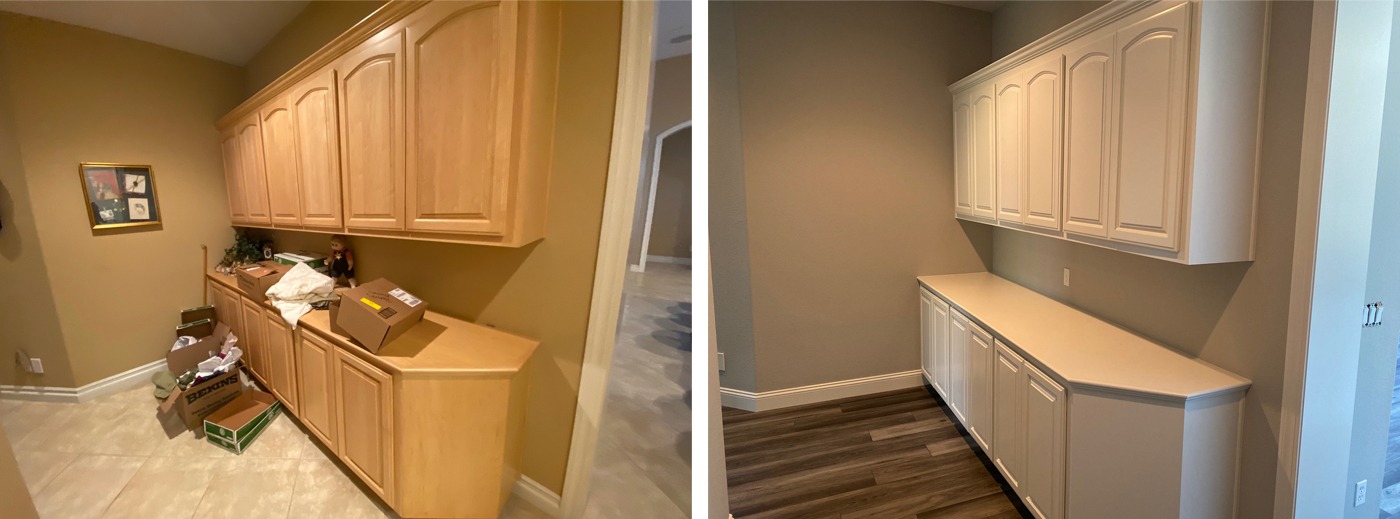
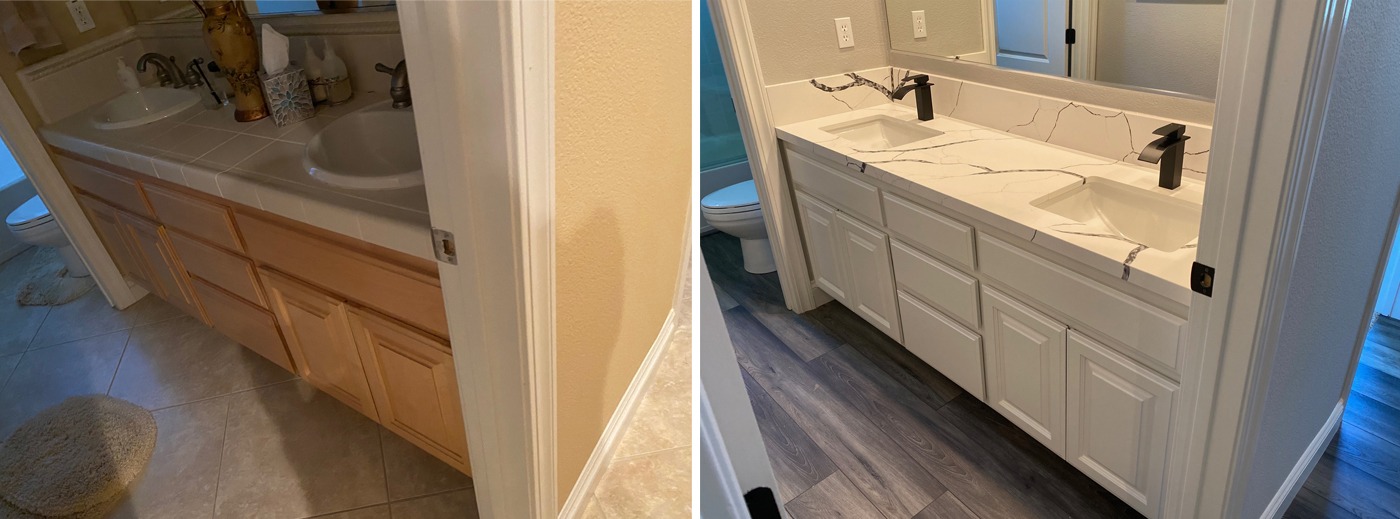
Custom Painting, Inc. recently took on the task of transforming a residence with eight distinct rooms featuring natural wood-faced cabinets. The comprehensive endeavor covered a total of 16 rooms, inclusive of bathrooms and closets. A notable aspect of this transformation was the shift from the warm, natural tones of the wood to a crisp, clean white finish on the cabinets.
In this guide, we will discuss every aspect of painting your home’s interior, so you know what to do when hiring a professional painting contractor.
Importance of Interior Painting
The importance of interior painting extends far beyond the realm of aesthetics. The colors adorning the walls of our homes play a significant role in shaping the atmosphere, mood, and overall experience within those spaces. The right choice of paint colors can invoke feelings of warmth, tranquility, energy, or sophistication, influencing how we perceive and interact with our surroundings.
Beyond emotional impact, interior painting serves practical purposes as well. It acts as a protective barrier for surfaces, shielding them from wear, tear, and environmental factors. Properly painted walls and surfaces are easier to clean and maintain, contributing to the longevity of the home’s interior elements.
Moreover, interior painting is a dynamic tool for self-expression. It allows homeowners to portray their personalities in their living spaces, creating environments that resonate with their unique tastes and styles. Whether opting for bold statements, muted tones, or intricate patterns, the choices made during interior painting reflect the individuality of the inhabitants.
Preparation for a Successful Home Interior Painting Project
Here’s a detailed guide on how to prepare for your upcoming painting project:
1. Clear the Space
Before the painters arrive, remove furniture, decorations, and other items from the rooms you want to be painted. Clearing the space facilitates an unobstructed painting process and safeguards your belongings from accidental splatters.
2. Clean and Repair Surfaces
Ensure that walls, ceilings, and trim are clean and free from dust, dirt, and grime. Repair any visible cracks, holes, or imperfections using spackle or putty. Smoothing out these surfaces creates an ideal canvas for the paint to adhere to.
3. Protect Flooring and Fixtures
Cover floors with drop cloths or plastic sheeting to shield them from paint spills. Use painter’s tape to protect baseboards, trim, and other fixtures that won’t be painted. Taking these precautions simplifies cleanup and preserves the integrity of non-painted surfaces.
4. Choose High-Quality Paint
Invest in high-quality paint for a lasting finish. Consider factors such as paint sheen, color choices, and whether you need specific types of paint for different areas (e.g., moisture-resistant paint for bathrooms).
5. Test Paint Colors
Before committing to a full application, test your chosen paint colors on a small section of the wall. This allows you to see how the colors look in your specific lighting conditions and how they interact with the room’s architecture.
6. Prime the Surfaces
A primer creates a smooth, uniform surface and enhances the paint’s adhesion. It also helps hide existing colors, stains, or imperfections.
7. Consider the Weather
Check the weather forecast before scheduling the painting project. Go for days with moderate temperatures and low humidity, as extreme conditions can affect the drying time and quality of the paint job.
8. Communicate with Painters
Maintain open communication with your painting professionals. Discuss your expectations, preferred timelines, and specific project details. Clear communication ensures everyone is on the same page and contributes to a smoother process.
9. Plan for Ventilation
Adequate ventilation is crucial during and after painting to disperse fumes and expedite drying. Open windows and doors and consider using fans/exhausts to promote airflow.
10. Allow for Drying Time
Patience is key. Give enough time to dry between coats and before moving furniture back into the room. Rushing this step can compromise the finish and durability of the paint.
When to Know It’s Time to Repaint Your Home’s Interior

Repainting your home’s interior is not just about aesthetics; it’s also about maintaining a healthy and vibrant living environment. Recognizing the signs that it’s time for a fresh coat of paint can help you address issues before they escalate.
Here are key indicators that your home is due for an interior painting service:
1. Faded or Discolored Walls
Over time, exposure to sunlight and daily living can cause paint to fade or discolor. If your once-vibrant walls now appear dull or discolored, it’s a clear sign that they could benefit from a new paint job.
2. Cracked or Peeling Paint
Cracks or peeling paint are unsightly and indicate potential issues with the paint’s adhesion. Ignoring this can lead to more extensive damage over time. Repainting is essential to maintain the integrity of your walls.
3. Visible Stains and Marks
Stains from water leaks, mold, or other substances can ruin the appearance of your walls. Attempting to cover these with spot treatments might not provide a uniform finish. A fresh coat of paint can effectively conceal these blemishes.
4. Worn or Damaged Trim
Trim and baseboards often experience wear and tear, especially in high-traffic areas. If they look scuffed, chipped, or worn, repainting them can rejuvenate the overall look of your interiors.
5. Outdated Color Schemes
If your interior color scheme feels outdated or no longer aligns with your taste, it’s a perfect opportunity to refresh your living spaces. A new color palette can breathe life into your home and reflect your current style.
6. Cracked Drywall
Cracks in the drywall can indicate structural settling or changes in humidity. Addressing these issues and repainting the affected areas restores aesthetics and helps protect against further damage.
7. Mood and Style Change
As your lifestyle evolves, so do your preferences for the ambiance of your home. If your interior paint doesn’t align with your desired mood or style, it’s time to change. Consider updating colors that resonate with your current aesthetic.
8. Increased Wear in High-Traffic Areas
Areas with high foot traffic, such as hallways and entryways, are prone to more wear and tear. If you notice that the paint in these areas is visibly worn, repainting can enhance the durability and longevity of your walls.
9. Selling or Renting Your Home
If you’re preparing to sell or rent your home, a fresh coat of paint can significantly enhance its market appeal. Neutral and well-maintained interiors leave a positive impression on potential buyers or tenants.
10. Personalization and Renovation
Major life events, renovations, or a desire for a fresh look may prompt the need for interior repainting. It’s an excellent way to personalize your space and integrate any changes or updates.
Choosing the Right Paint for Your Home Interior
Selecting the right paint for your home’s interior is a major step in achieving the desired look and longevity of the finish. Here are key considerations when choosing interior paint:
1. Different Types of Interior Paint
Latex (Water-Based): Latex paint is popular for its quick drying time, easy cleanup with water, and low odor. It’s a versatile choice for most interior spaces.
Oil-Based: Oil-based paints are known for their durability and smooth finish. They are an excellent choice for high-moisture areas like kitchens and bathrooms. However, they have a longer drying time and require mineral spirits for cleanup.
Zero-VOC or Low-VOC: These paints have minimal or no volatile organic compounds, making them environmentally friendly and suitable for those sensitive to paint fumes.
2. Selecting the Right Paint Finish
Flat or Matte: Ideal for low-traffic areas like bedrooms and ceilings, flat finishes offer a smooth appearance but are less resistant to stains and scuffs.
Eggshell: A slightly glossier finish like eggshell is easy to clean and works well in living rooms and dining areas.
Satin: With a subtle sheen, satin finishes are durable and washable, making them suitable for high-traffic areas like hallways and children’s rooms.
Semi-Gloss: Semi-gloss provides a noticeable sheen and is excellent for moisture-prone areas, such as kitchens and bathrooms. It’s easy to clean and adds a touch of elegance to trim and doors.
High-Gloss: The glossiest finish, high-gloss paints are exceptionally durable and moisture-resistant. They are commonly used on doors, trim, and cabinets.
3. Consideration of Color and Style
Personal Style: Consider your personal preferences and the overall style you want to achieve in each room. Warm tones create a cozy atmosphere, while cool tones can evoke a sense of calm.
Room Size: Lighter colors make a room feel more spacious, while darker colors create a cozy and intimate atmosphere. Consider the size and purpose of the room when choosing colors.
Natural Light: The amount of natural light in a room can affect how paint colors appear. Test samples in different lighting conditions to ensure the chosen color works well throughout the day.
4. Primer
Using a quality primer is essential for achieving a smooth and long-lasting finish. Primer prepares the surface, enhances paint adhesion, and helps achieve more accurate color results.
5. Test Samples
Before committing to a large area, test paint samples on a small wall section to see how they look in the actual space. This allows you to assess how the color interacts with the room’s lighting and furnishings.
Essential Tools and Materials for Your Home Interior Painting Project

To execute a successful home interior painting project, ensure you have the following tools and materials on hand:
1. Paint Brushes and Rollers
Invest in high-quality paintbrushes and rollers suitable for the type of paint you’re using. Different brushes are designed for specific surfaces, so choose accordingly for walls, trim, and corners.
2. Painter’s Tape
Use painter’s tape to achieve crisp and clean lines along the edges. It will help prevent paint from bleeding onto adjacent surfaces. It’s particularly useful for creating straight lines where walls meet ceilings, baseboards, or trim.
3. Drop Cloths
Protect your furniture, flooring, and fixtures with drop cloths or plastic sheeting. These coverings shield surfaces from paint splatters and drips, ensuring your belongings remain unharmed during the painting process.
4. Paint Trays and Buckets
Pouring paint into trays and buckets makes the application process more efficient. It also allows for easy dipping of brushes and rollers. Choose trays that accommodate the size of your rollers and brushes to avoid unnecessary mess.
5. Sandpaper and Other Prep Tools
Sandpaper is essential for smoothing surfaces, especially after patching holes or imperfections. Additionally, have prep tools such as putty knives and spackle for repairing minor wall damages before painting.
6. Rags or Tack Cloths
Keep rags or tack cloths on hand for wiping away dust or debris before painting. This ensures a clean surface, allowing the paint to adhere properly.
7. Paint Stirrer
Stir your paint thoroughly before starting to ensure an even consistency. A paint stirrer or mixing stick is a simple yet useful tool for achieving a uniform color.
8. Extension Poles
For ceilings or high walls, consider using extension poles for your rollers. This makes it easier to reach elevated areas without the need for ladders.
9. Paint Trays and Bucket Liners
Simplify cleanup by using disposable tray liners. Once the job is complete, you can discard the liner and reuse the tray for future projects.
Preventive Measures During Your Home Interior Painting Project
Starting a home interior painting project requires attention to safety to protect both yourself and your living space. Here are crucial safety precautions to follow:
1. Proper Ventilation
Ensure adequate ventilation by opening windows and doors. This helps dissipate paint fumes and promotes fresh air circulation, creating a healthier environment for you and your home.
2. Use of Protective Gear
Prioritize safety by wearing appropriate protective gear. This includes safety goggles to shield your eyes from splatters, a dust mask to prevent inhalation of paint particles, and disposable gloves to safeguard your skin.
3. Handling and Disposing of Paint and Chemicals
Follow proper procedures for handling and disposing of paint and chemicals. Store paint cans securely and away from heat sources. Dispose of empty paint cans according to local regulations and avoid pouring excess paint down drains or sinks.
4. Fire Safety
Take fire safety precautions seriously. Keep flammable materials, such as rags soaked in paint thinner, in a sealed metal container. Store this container away from heat sources to minimize the risk of spontaneous combustion.
5. Emergency Preparedness
Be prepared for unexpected situations by having a fire extinguisher on hand. Familiarize yourself with the location of emergency exits and ensure they are easily accessible during the painting process.
6. Electrical Safety
Exercise caution when working near electrical outlets or switches. Cover electrical outlets with painter’s tape and avoid painting over light switches. If you need to remove outlet covers, turn off the power in that area before doing so.
7. Ladder Safety
If using a ladder, ensure it is stable and positioned on a level surface. Avoid overreaching or standing on the top rungs. If the job requires reaching high areas, consider using extension poles or hiring a professional.
Mastering Painting Techniques for a Flawless Finish
Achieving a professional-looking finish during your home interior painting project involves mastering various painting techniques. Here’s a guide to help you elevate your painting skills:
1. Cutting in and Edging
Cutting in:
Cutting in involves using a paintbrush to carefully paint along the edges where two surfaces meet, such as where the wall meets the ceiling, corners, or around windows and doors.
The primary purpose of cutting in is to create clean lines and define the boundaries of the painted area.
Edging:
Edging is a broader term that includes both cutting in and using painter’s tape to mask off areas and create straight lines.
Like cutting in, edging ensures the paint is neatly applied along the edges and corners. It also involves using painter’s tape to protect adjacent surfaces from unintentional paint splatter or overlap.
2. Rolling Walls and Ceilings
Rolling walls and ceilings is a fundamental step in the interior painting process that involves using a paint roller to apply a consistent and even coat of paint to large, flat surfaces. This technique is particularly efficient for covering expansive areas like walls and ceilings, ensuring a uniform appearance throughout the room.
To execute this technique effectively, painters typically start by loading the roller with an appropriate amount of paint. They then use long, even strokes to roll the paint onto the surface, working from top to bottom. The key is to maintain consistent pressure and avoid overloading the roller, which can lead to drips and uneven coverage. Rolling is often paired with cutting in and edging to create a seamless transition between edges and large surfaces.
3. Blending and Touch-Ups
Blending and touch-ups are crucial to achieving a flawless and cohesive appearance during an interior painting project. Blending refers to the process of seamlessly merging new paint with the existing painted surface to eliminate any visible lines or edges. This is particularly important when sections of a wall or other surfaces are painted at separate times or by different methods.
Touch-ups involve addressing imperfections or areas that require additional attention after applying paint. This could include covering small blemishes, correcting uneven spots, or refining the paint job for a polished look. The combination of blending and touch-ups contributes to a seamless and visually appealing interior, which provides a refined finish that enhances the space’s overall aesthetic.
4. Avoiding Common Mistakes
Learn from common painting mistakes to enhance your technique. Avoid overloading the brush or roller, as excess paint can lead to drips and uneven coverage. Take your time and be patient, allowing each coat to dry thoroughly before applying the next.
5. Painting Cabinets
Transform the look of your space by painting cabinets. Ensure proper surface preparation by cleaning and sanding the cabinets. Use a high-quality primer and paint suitable for cabinets and apply multiple thin coats for durability.
Choosing Professional Painters
If you’re considering hiring professional painters, follow these steps for a stress-free and successful experience:
1. Knowing When to Hire Professionals
Consider hiring professionals when faced with a large-scale project, intricate details, or time constraints. Professionals can provide expertise and efficiency if the task seems overwhelming or requires specialized skills.
2. How to Choose the Right Painting Contractor
Research local painting contractors and gather recommendations from friends, family, or online reviews. Look for contractors with relevant experience, proper licenses, and insurance. Check their portfolio to assess the quality of their work.
3. Getting Estimates
Reach out to multiple contractors for estimates. A detailed estimate should include the cost of labor, materials, paint, and any additional services. Ensure the estimate outlines the scope of work and timelines.
4. Contracts and Agreements
Once you’ve selected a contractor, ensure all details are documented in a clear and comprehensive contract. This should include project timelines, payment schedules, the specific areas to be painted, and the paint type to use. Clarity in the contract helps avoid misunderstandings later.
5. Checking References
Ask the contractor for references from previous clients. Contact these references to inquire about the contractor’s work quality, reliability, and communication. This step provides valuable insights into the contractor’s professionalism.
6. Communication and Collaboration
Effective communication is key to a successful partnership. Discuss your expectations, color preferences, and any specific details related to the project. A collaborative approach ensures that your vision is understood and executed.
Conclusion
The satisfaction derived from a well-executed interior painting project extends beyond the aesthetic appeal. You can personalize your home and create an environment that resonates with your style and preferences. A freshly painted interior enhances visual appeal and contributes to a sense of comfort and pride in your living space.
Before you start, know when your home needs a new coat. Then, pick the right paint type and finish, and choose colors that fit your style. Now, here’s the nitty-gritty: clear the room, shield your stuff, fix any holes, and get your surfaces ready.
A freshly painted home feels fantastic and lasts a long time. So, if you’re thinking of an interior paint job, let our professionals at Custom Painting, Inc. help you transform your space! You can reach us by calling (925) 294-8062 or by completing the Contact Us form on our website.